
Both the appointments and the resources are presented in a calendar-like view. Via the user menu at the top right, you can adjust several settings most of which relate to the display, or select the user interface language.
Using the calendar view
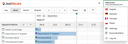
The top buttons
Using the buttons at the very top, you can adjust the size of the time window to be shown. A small time window makes it easier to deal with many appointments taking place within a short period of time, whereas a larger time window provides a clearer overview. Note that only appointments touching the time window are displayed as rows in the list.
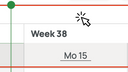
You can mark a point in time you want to focus on later with a green pin. To position it, click anywhere within the three rows near the top where you can select the size of the time window, a specific day, etc. Click the pin button to return to that point in time after viewing or editing an earlier or later appointment.
The arrow buttons move the time window forward or backward by the selected window size, or by one day. There’s also a “Today” and a calendar button for selecting the current date or, respectively, a specific date.
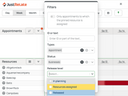
The “Appointments” and “Resources” sections
You can sort the appointments by their start date or their name using the “Sorting” menu in the “Appointments” header. The resources are always ordered alphabetically.
If you want to adjust the width of the left area, just drag the dividing line and drop it at the desired position.
The height of the “Resources” section can be changed as well using the “Edit layout” menu in its header, or simply by dragging and dropping the horizontal dividing line between the two sections upward or downward with your mouse.
Both sections offer filters you can use to exclusively focus on items that meet your criteria, e.g., their type, the appointments’ status or release level, or – with resources – their group or required skills.

If your use case doesn’t involve resources, as is the case with mailings, for example, you can hide the “Resources” section via a tenant-wide option in your settings, provided your permissions allow you to do so. You can access the settings via your profile menu at the top right.
Appointments
Appointments have a name (or subject) which is displayed on the left-hand side, and a start and an end date, i.e., a duration which is displayed in the calendar area as a bar sized according to the time slot occupied.
If you wish to have the respective status of the appointments displayed, you can activate the desired statuses in your settings by assigning them individual colors. This will make the statuses appear as small dots in front of the appointment names and on the details panel.
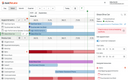
If your mouse pointer hovers over an appointment’s time slot, a tooltip showing its key data appears. Clicking the time slot marks and selects the appointment as well as the resources assigned to it, and also opens the appointment’s details panel.
Resources
Resources also have a name and, of course, occupy the same time slots as the appointments they belong to. Hovering with the mouse pointer over any of a resource’s time slots, or clicking it there, has the same effect as for the corresponding appointment.
In order to see only the appointments associated with a specific resource, select and then pin it using the pin button to the right of its name, or via the resource’s entry on the details panel.
Resources causing a conflict because they are multiply assigned to one or more other appointments are displayed in red, and listed on the details panel. See Editing an appointment on how to handle such a situation.